
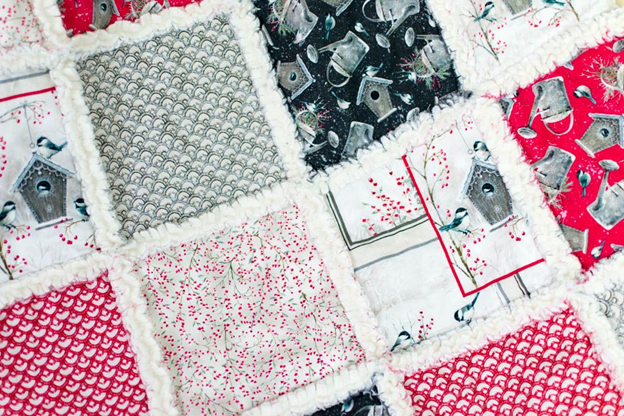
How to Sew a Quilt Using Only Fat Quarter Bundles
Dreaming of sewing your own quilt but don’t want to commit to buying loads of fabric by the metre? Good news—you can make a full-size quilt using nothing but fat quarters. Yup, those small, square-ish fabric cuts are all you need to turn your vision into something warm, personal, and handmade.
In this step-by-step guide, we’ll walk you through the entire process—from planning and cutting to piecing and binding—using only fat quarter bundles.
First, What Are Fat Quarters?
A fat quarter is a pre-cut piece of fabric, usually measuring 18″ x 22″. Unlike standard quarter-yard cuts (which are long and narrow), fat quarters give you more flexibility in cutting and piecing. They’re especially useful for quilting because they offer a decent chunk of fabric without committing to large yardage.
Want to stock up? Browse premium fat quarter bundles here.
Materials You’ll Need
- 12 to 20 fat quarters (depending on quilt size)
- Rotary cutter and cutting mat
- Quilting ruler
- Batting (size based on final quilt)
- Backing fabric
- Pins or clips
- Sewing machine
- Iron and ironing board
- Binding tape or extra fat quarters for binding
- Optional: Drawstring cord for turning your quilt into a roll-up storage piece
Step-by-Step Quilt Tutorial Using Fat Quarters
Step 1: Choose Your Fat Quarters Wisely
Start by selecting 12 to 20 fat quarters in complementary colours or patterns. Most quilts need at least 3–5 yards of fabric, so plan accordingly. You can go with a coordinated bundle or mix your own from different themes.
Step 2: Cut the Pieces
Using a rotary cutter and ruler, cut each fat quarter into your chosen quilt block shape. Some beginner-friendly block styles include:
- 5″ x 5″ squares (aka charm squares)
- 6″ x 12″ rectangles
- Half-square triangles
The goal is consistency—whatever size or shape you go with, stick to it throughout the project.
Step 3: Layout Your Design
Before you start stitching, lay your blocks out on the floor or a large table. Play around with colour balance and pattern placement until you’re happy. Take a photo so you don’t forget your layout!
Step 4: Sew the Blocks Together
Sew your pieces into rows using a quarter-inch seam allowance. Press seams as you go (either open or to one side). Then sew the rows together, again pressing each seam for a clean finish.
Pro Tip: Sew slowly and use quality thread to avoid tangling or skipped stitches.
Step 5: Add Batting and Backing
Once your quilt top is complete, lay it over the batting and backing fabric. Smooth out any wrinkles and baste the layers together with safety pins or spray adhesive.
Step 6: Quilt It
You can go as simple or as fancy as you like here. Straight-line quilting is a great option for beginners. Use your machine to stitch through all three layers, following the seams or creating a grid pattern.
Step 7: Bind the Edges
To finish your quilt, sew binding around the entire edge. You can use pre-made binding or cut extra strips from your fat quarters. Fold, stitch, and secure your edges for a polished finish.
Bonus Tip: Add a Drawstring for Storage
Want to make your quilt super portable? Add a pouch or strap to one edge, using drawstring cord to cinch it into a roll. It’s a clever way to take your quilt outdoors or store it neatly in a small space.
Final Thoughts
Quilting might sound like a massive project, but using fat quarters keeps it beginner-friendly and budget-conscious. These pre-cut pieces make it easy to dive into quilting without the stress of matching yardage or wasting fabric.
Whether you’re going for bold patterns or a soft, cohesive colour palette, fat quarter bundles make it easy to bring your vision to life. And don’t forget to get creative with details like drawstring accents if you want something functional and fab.
Now, grab your rotary cutter and make something cozy. You’re officially ready to quilt like a pro.
Popular Posts
 Everyday Outfit Inspiration: Simple Style Ideas That Always Work
 Chisaisangue: Meaning, Origins, Cultural Context, and Modern Interpretations
 Who Is Ubyhojytera Opponent? Full Explanation & Truth Revealed
 Can vallpo523.zvc5.0o Improve Your Skin or Cause Damage
 Finding Out 30.6df496–j261x5 in Cooking: A Curious Kitchen Discovery
 Beyond Beauty: How Cosmetic Surgery Boosts Confidence and Self-Esteem
 Facing Charges in LA? What a Los Angeles Criminal Lawyer Can (and Can’t) Do for You
- The Timeless Beauty of Toi et Moi Ring NZ with Lab Diamonds
 The Charm of Gota Patti Work on Lehenga Sets for Girls
Prince Andrew: The Latest Developments and Controversies
Recent Posts
 Lab Grown Diamonds London How to Choose the Right Stone
  Toi et Moi Ring A Romantic Design That Never Goes Out of Style
 How to Style Jewelry with Everyday Outfits: A Complete Guide to Effortless Elegance
 Lab Grown Diamond Earrings: A Smart, Stylish, and Sustainable Choice
 Budget-Friendly Pearl Sets: How to Find Real Quality Under 100 Euro
 Lab Grown Diamond Bracelets: Sustainable Luxury and Sparkle in Spain
 14K Gold Art Deco Cufflinks with Diamonds and Sapphires: Vintage 1920s Jewelry Guide
 Engagement Rings in Brisbane: A Thoughtful Guide for Modern Couples
- Best Practices for Implementing a Knowledge Management System in Your Organization
 Effortless Elegance: Sparkling Earrings Styling Hacks for Every Season!
Must Read
 Why Maternity Tops Ride Up (And What Actually Fixes It)
 What to Look for Before You Buy Cotton Fabric in Bulk
 Shopping for Plus Size Wedding Dresses: Top Styles for Your Big Day
 Ethical swimwear brands to watch: why Festa Foresta stands out
 Women Pajamas: Combining Comfort and Style
 Redefining Sensuality: The Intriguing Allure of Pink Camo Lingerie
 Prom Dresses for the Perfect Evening | Amarra
 All About Raw Looks – Their Designers and Trends in the Fashion Industry
 Different Type Of Fabrics Available For Your Dress Making
 How To Choose The Perfect Tie For Men